Welcome Back, Builder! 👋
This is “vibe coding” at its finest: you describe what you want, AI builds it, and you iterate until it’s perfect. In this workshop, we combined Lovable (front-end builder) with Crew AI (multi-agent backend) to create intelligent applications that actually work. We built a complete resume evaluation system that analyzes candidates across multiple dimensions – hard skills, soft skills, potential, and ATS compatibility.
Whether you’re building productivity tools, business automation, or AI-powered products, this combination gives you the speed of no-code with the power of custom development. By the end, you’ll have the skills that put you in the top 0.01% of builders.
🎯 Your Mission: Finish building your app and get it fully working!
📹 Workshop Recording
Quick Navigation:
- 00:00 – Introduction & Setup
- 06:30 – Claude Prompt Generation
- 22:00 – Building in Lovable
- 48:00 – Building in Crew AI
- 1:08:00 – Connecting the Two Systems
- 1:28:00 – Testing & Debugging
✅ Your Checklist: Complete These Steps
Use this checklist to track your progress:
- Step 1: Generate prompts with Claude
- Step 2: Build front-end in Lovable
- Step 3: Publish Lovable app
- Step 4: Build back-end in Crew AI
- Step 5: Publish Crew AI automation
- Step 6: Connect via API
- Step 7: Test end-to-end
- Step 8: Share your success!
Step 1: Generate Your Prompts with Claude
📹 Watch: 6:30 – 22:00 in recording
Why Start Here?
Instead of building directly, we use Claude to create optimal prompts for both Lovable and Crew AI. This ensures professional-quality results and saves hours of iteration.
Action Items:
- Go to claude.ai (or use Perplexity Pro, ChatGPT – your choice)
- Copy-paste the meta-prompt below
- Wait for Claude to generate TWO prompts
- Save both prompts for the next steps
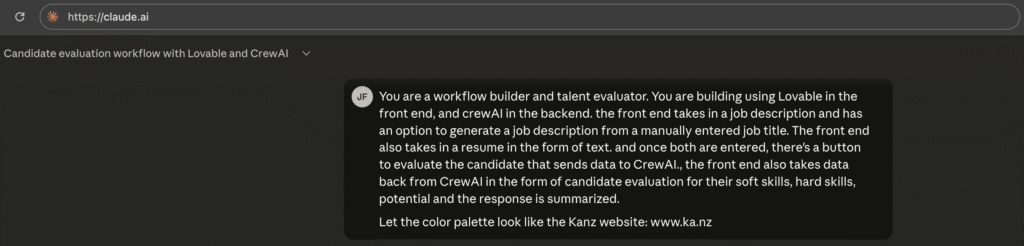
The Meta-Prompt
CLAUDE META-PROMPT
You are a workflow builder and talent evaluator. You are building using Lovable in the front end, and crewAI in the backend. the front end takes in a job description and has an option to generate a job description from a manually entered job title. The front end also takes in a resume in the form of text. and once both are entered, there's a button to evaluate the candidate that sends data to CrewAI., the front end also takes data back from CrewAI in the form of candidate evaluation for their soft skills, hard skills, potential and the response is summarized.
Let the color palette look like the Kanz website: www.ka.nz

Your job is to create two prompts, one for Lovable and one for CrewAI THAT I can simply copy paste to each.
What You’ll Get:
✅ Prompt 1 for Lovable
✅ Prompt 2 for Crew AI
💡 Pro Tip: The better you describe your idea to Claude, the better prompts you’ll get. Be specific!
Step 2: Build Your Front-End in Lovable
📹 Watch: 22:00 – 48:00 in recording
Setup
- Go to lovable.dev
- Create a free account
- Click “Create New Project”
- You’ll see a single prompt box
Build Process
- Paste Prompt 1 (the Lovable prompt Claude generated)
- Watch Lovable build your interface in real-time
- Wait 2-5 minutes for initial build
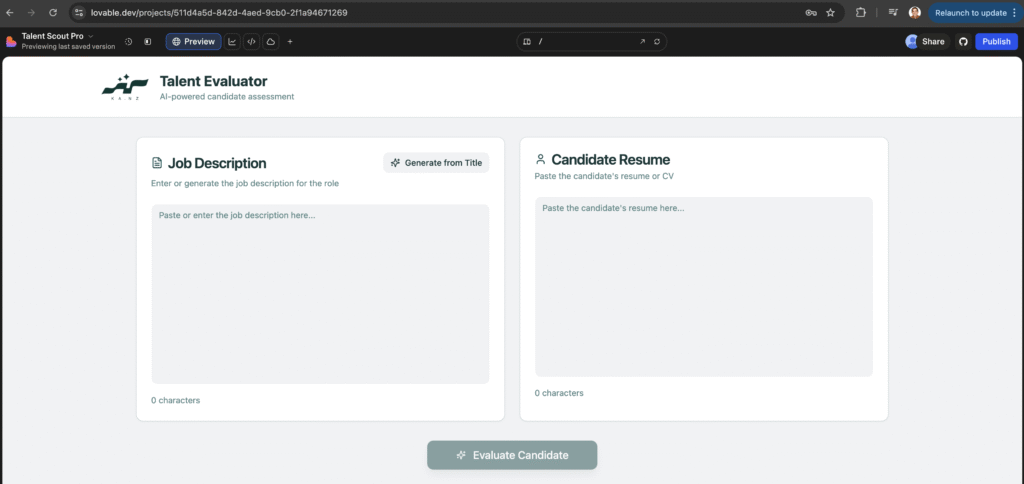
What Gets Created:
Your app will have:
- Job description input field and the “Generate from Title” button
- Resume text area and the “Evaluate Candidate” button
- Results display section
- Clean, professional styling
Common Issues & Fixes
Problem: “Failed to generate job description”
Solution: Tell Lovable:
When I click "Generate from Title" and enter text in the text box,
I get an error saying "Failed to generate job description". Fix the error.
Problem: Need to enable AI features
Solution: Click “Enable Cloud” when prompted (allows LLM access)
Problem: Don’t like the colors/design
Solution: Say:
Make the colors match a website e.g. ka.nz
Replace the logo with [attach file]
Use a more modern/professional/minimal design
Iterating with Lovable
Remember: Lovable is conversational. Keep chatting until it’s right:
- “The button should be larger”
- “Add spacing between sections”
- “Make the font more readable”
Testing Locally
Before publishing, test:
- Generate a job description from a title
- Paste a sample resume
- Click “Evaluate Candidate”
Expected at this stage: Basic evaluation (won’t be sophisticated yet – that comes from Crew AI)
Step 3: Publish Your Lovable App
📹 Watch: 39:00 – 43:00 in recording
Publishing Steps
- Click Publish button (top right corner)
- Choose your subdomain:
- Example:
resume-evaluator-yourname.lovable.app - Check availability
- Confirm
- Example:
- Wait 1-2 minutes for deployment
- Get your live URL!
Optional: Custom Domain
If you own a domain:
- Click “Add Custom Domain”
- Follow DNS setup instructions
- Point CNAME to Lovable servers
Example from workshop: resume.cans.sa, compliance.cans.sa, ai.cans.sa
Milestone Check 🎉
At this point you should have:
- ✅ A live, published web app
- ✅ Working job description generator
- ✅ Resume input field
- ✅ Basic evaluation (not connected to Crew AI yet)
Step 4: Build Your Back-End in Crew AI
📹 Watch: 48:00 – 1:08:00 in recording
Why Crew AI?
Crew AI gives you control over the “brain” – multiple AI agents working together to analyze, evaluate, and generate insights. Each agent is like a specialized expert.
Setup
- Go to crewai.com
- Click “Skip and explore on my own”
- Navigate to Crew Studio
Build Process
- Paste Prompt 2 (the Crew AI prompt Claude generated)
- Watch Crew AI build your multi-agent system
- Wait 3-7 minutes for workflow creation
Understanding Your Workflow
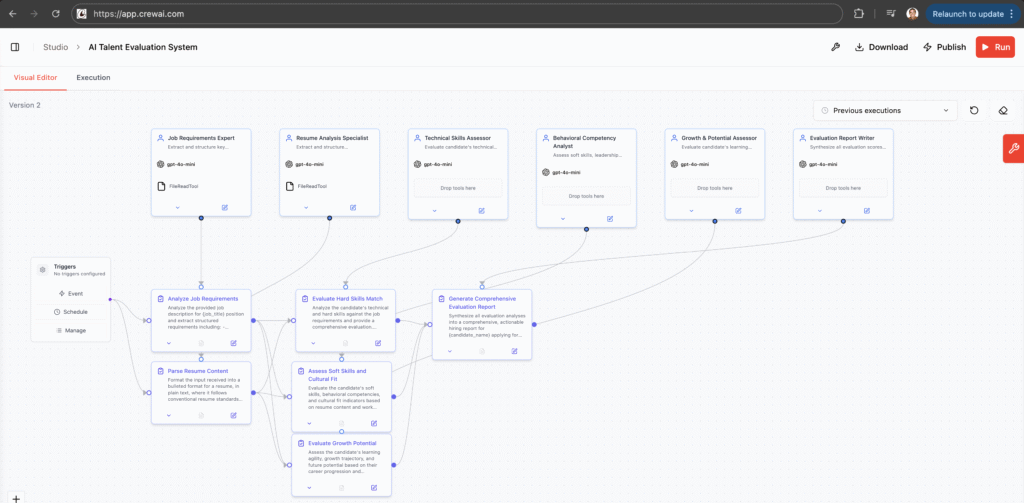
Crew AI creates these agents automatically:
- Job Description Analyzer: Extracts requirements
- Resume Parser: Structures candidate info
- Hard Skills Evaluator: Assesses technical abilities
- Soft Skills Evaluator: Reviews interpersonal skills
- Potential Evaluator: Analyzes growth trajectory
- Report Generator: Synthesizes everything
How Agents Work Together
Job Description → Job Analyzer
                       ↓
Resume Text → Resume Parser
                       ↓
            Skills Evaluators (parallel)
                       ↓
              Report Generator
                       ↓
           Comprehensive Output
Each agent:
- Has a specific role and goal
- Uses an LLM (GPT-4, Claude, etc.)
- Passes output to the next agent
- Can work in parallel for speed
Customizing Agents
Click on any agent to see/edit:
- Role: What the agent does
- Goal: What it’s trying to achieve
- Backstory: Context for better responses
- Expected Output: Format and structure
Example from workshop:
Role: Resume Parser
Goal: Format the input received into bulleted format for a resume in plain text
Expected Output: Structured resume with job experience, title, dates, accomplishments
Testing Your Workflow
- Click Play button (top right)
- Enter test data:
- Job title: “Marketing Manager”
- Resume: Paste your resume
- Click Execute
- Watch agents run in sequence
- Review output in “Execution” tab
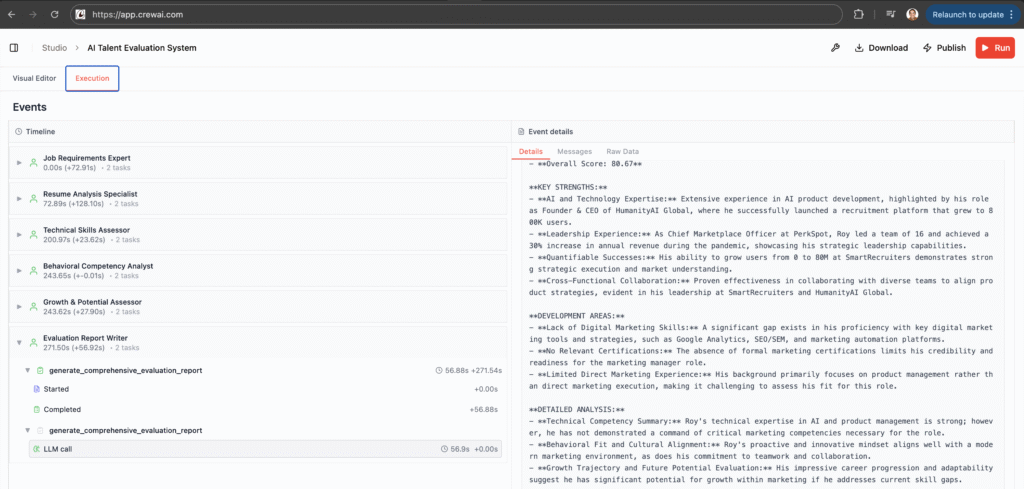
Understanding Execution Logs
Click on each agent to see:
- Status: Running, Complete, Failed
- Raw Data: Actual output
- LLM Calls: How many AI requests were made
- Tokens Used: Cost tracking
Common Issues & Fixes
Problem: Agent running too slow
Solution: Simplify the prompt – remove unnecessary analysis
Problem: Output not in expected format
Solution: Edit the “Expected Output” field to be more specific
Problem: Agents not connecting properly
Solution: Check the visual editor – arrows should connect logically
Step 5: Publish Your Crew AI Automation
📹 Watch: 1:10:00 – 1:16:00 in recording
Quick Publishing
- Click Thunderbolt icon (top right)
- Click “Ready to Go Live”
- Wait 5-7 minutes
- Status shows “Online”
Get Your API Credentials
Click on your automation to find:
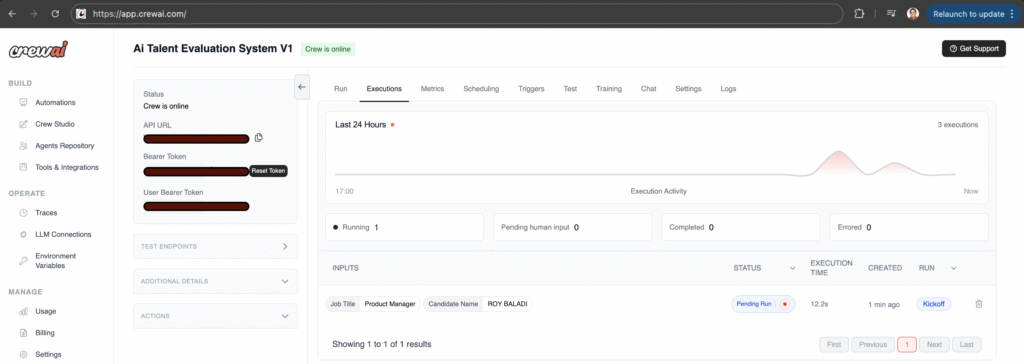
Copy these (use the copy buttons – no extra spaces!):
- ✅ API URL
- ✅ Bearer Token
- ✅ User Bearer Token
⚠️ Don’t share these publicly
Milestone Check 🎉
- ✅ Status showing “Online”
- ✅ API credentials saved
Step 6: Connect Lovable to Crew AI
📹 Watch: 1:16:00 – 1:28:00 in recording
The Connection Prompt
Go back to Lovable and paste (with YOUR credentials):
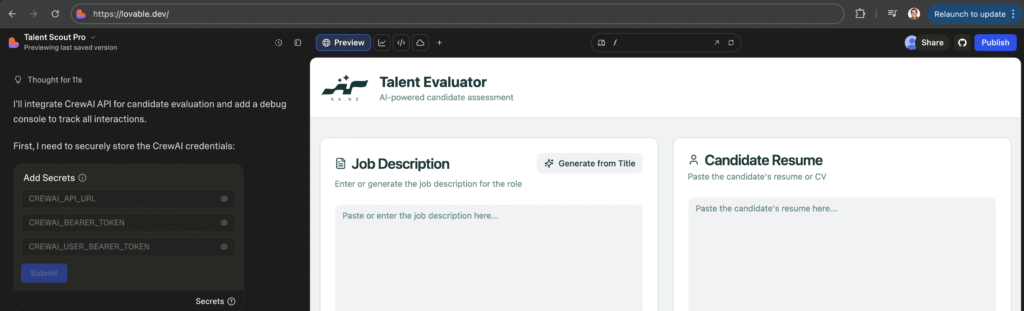
Template:
Connect when I click "Evaluate Candidate" with Crew AI's API to submit
the information to it and retrieve information from it.

Credentials:
- API URL: [YOUR_API_URL_HERE]
- Bearer token: [YOUR_BEARER_TOKEN_HERE]
- User bearer token: [YOUR_USER_BEARER_TOKEN_HERE]

In addition, create a collapsible debug console at the bottom of the page
that lists in detail every interaction between Lovable and Crew AI.
This takes 5-10 minutes – be patient!
Quick Debug Guide
If you get errors, tell Lovable exactly what you see:
“Failed to fetch”:
I'm getting "Failed to fetch" error. Fix the edge functions configuration.Wrong data format:
Crew AI expects job title and candidate name. Extract these from the inputs
before sending to Crew AI.
From workshop: Took 2-3 iterations to get working. Keep describing errors until it fixes them!
Step 7: Test End-to-End
📹 Watch: 1:28:00 – 1:32:00 in recording
Full System Test
- Open your published Lovable app
- Generate/paste a job description
- Paste a resume
- Click “Evaluate Candidate”
- Open debug console
- Watch results appear!
Expected Output
You should see:
- Overall recommendation & score
- Hard skills score (0-100)
- Soft skills score (0-100)
- Growth potential score (0-100)
- Detailed analysis
- Improvement suggestions
Success Criteria
✅ Evaluation triggers Crew AI
✅ Debug console shows communication
✅ Results display comprehensive analysis
✅ All scores appear
Not working? Check debug console for specific errors and paste them back to Lovable.
Working? drop Sandra or Roy an email to show us your work!

Roy Baladi is a tech entrepreneur who earned degrees in computer science, mathematics, and finance from Virginia Tech before working as a derivatives trader on Wall Street during the 2008 financial crisis.
Roy’s tech career took off at SmartRecruiters in San Francisco, where he served as Head of Marketplace and saw the company scale pre-revenue to a unicorn.
He since founded Jobs for Humanity to connect under-represented communities with global employers. Today, Baladi leads Kanz, the AI recruiter that has scaled to 1 million job seekers.